
For my 4th Kitplus article I thought I’d highlight an effect in Premiere Pro that frankly I would be lost without. Namely - time remapping.
I own and work with a Sony FS7 (other cameras are available) - and given that it’s now one of the most popular cameras in UK broadcast today I’d be willing to guess most editors will have come across the clips from that camera at one point or another.
One of the coolest features of the FS7 is that it will shoot up to 150 frames per second continuously in HD - and we all know everything looks better in slow-motion right?
The biggest drawback in working with high-frame rate clips however, is that if you use them all the time, they can become quite dull. That’s where the time-remap feature in Premiere Pro comes in really useful. Premiere also has a great option built in for clips that weren't originally shot in high-frame rate. So let’s dive in and have a look.
If you take a look at the timeline you can see we have some clips on it. The sequence for this timeline is set to 25p. When you add a slow motion clip to it, you’ll see that it defaults to the 25p standard which is dictated by the sequence setting.
When you play this clip back, it will play in slow-mo continuously - from start to finish.
On this occasion - we want it to play back at regular speed - then dip into slow motion, then snap or ramp back into regular 25fps again. This gives us our speed ramp look.
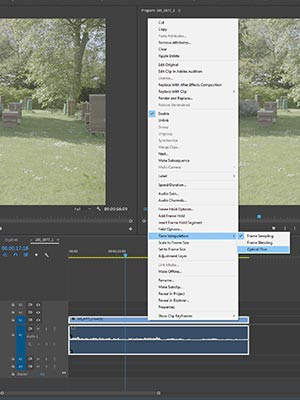
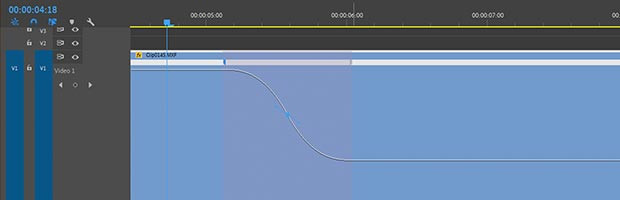
So in order to make this work we need to right-click onto the grey clip FX box and select time-remapping>speed. Having done this, let’s increase the video track height of the clip on video track one so it’s nice and big and we can see what we’re working with.
The white line you can see running across the length of the clip now refers to the speed of that particular clip. If you click and drag it upwards - you will increase the speed, and if you lower it you will slow the clip down. As this clip is already in slow-motion, the goal here is to increase the speed so that it plays back in real time - i.e at regular speed.
The amount you will need to increase it by will depend on the frame rate at which it was shot. With a clip shot at 100fps, you’ll need to increase its speed by a factor of 4 to 400%. Simple maths. Best thing to do is make the change, then view it and let your eyes make the decision.
Once you have it playing back at normal speed, pick a spot where you want the slow mo to begin - then (pc) control+click or (mac) cmd+click onto the speed line. This will add a key frame. Now, when you drop the speed line immediately after the keyframe to 100%, you’ll get a really cool effect - regular speed to slow mo, in one frame. Looks ace!
One thing to bear in mind about the keyframe you created on this speedline, is that you can actually split this keyframe, & drag the two points apart from one another to create a ramp. It’s a bit finicky to get make it work, but with perseverance it becomes easier. You’ll find at first that you have a straight consistent line of acceleration from the point where the speed change begins, to the point where it ends. However if you click in between the gap, you’ll see you get a blue handle. If you now click and drag this handle to the right or left, you’ll see you can create a curve.
You’ll find also that once you’ve created these points, that it can be tricky to move them around to where you want them. For this, I would advise holding your (pc) alt key or (mac) option key when dragging. This gives you full control over the exact point when your speed change begins & ends. This technique is used best and has the most impact when you time the speed change points to beats in your chosen music.
The final thing to mention here, is that whilst this is all possible to do with clips that were not shot in high-frame rate, you will probably find that the end result looks jerky and often a little bit rubbish.
That’s where optical flow comes in. If you want to take advantage of this, then simply choose your clip & right click it - then scroll down to time interpolation> optical flow. Premiere will now do it’s best to interpolate frames in between the ones you have shot, to smooth the slow motion effect. It really is a great little technique - so give it a go!
Find out more from MediaCity Training and the courses they offer at www.mediacitytraining.com and check out their taster sessions at the KitPlus Show in MediaCityUK on 5th November.